Address
[wueseai_login_modal button_text="Sign In Now" button_class="px-6 py-3 bg-green-500 text-white rounded-full"]
Work Hours
Monday to Friday: 7AM - 7PM
Weekend: 10AM - 5PM
Address
[wueseai_login_modal button_text="Sign In Now" button_class="px-6 py-3 bg-green-500 text-white rounded-full"]
Work Hours
Monday to Friday: 7AM - 7PM
Weekend: 10AM - 5PM

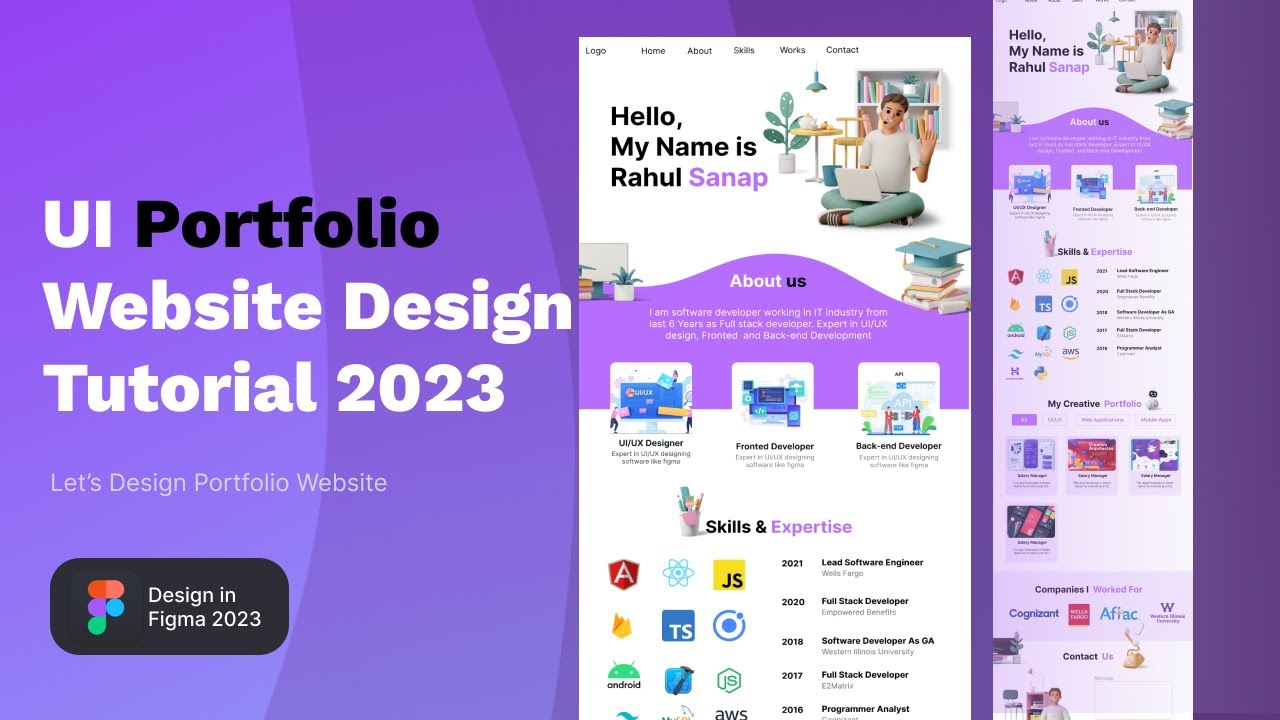
This guide walks you through creating a professional portfolio website in Figma from scratch. We’ll cover setting up frames, designing navigation, building hero sections, and adding visual elements. An accompanying video demonstrates the complete process for visual learners.
Learn to design a modern portfolio website in Figma with five essential sections: home, about, skills, work, and contact. This beginner-friendly tutorial uses Figma’s intuitive tools to create a responsive, visually appealing layout in under 30 minutes, perfect for showcasing your projects online.
Start by visiting figma.com and creating a new design file. Name it “Portfolio Website” to keep your project organized. This initial step ensures all your design elements stay in one place.
Select a desktop frame for your design. Desktop frames provide a standard canvas size (typically 1440×900 pixels) that works well for portfolio websites. This size ensures your design looks professional on most screens.
Create a horizontal navigation bar at the top of your frame. Use a rectangle shape as the background and set its color to white for a clean look. This menu will guide visitors through your portfolio sections.
Add your logo placeholder on the left side. Then insert text labels for navigation items: Home, About, Skills, Work, and Contact. Figma’s alignment tools help space these items evenly—aim for 60 pixels between each item for balanced spacing.
Below the navigation, create your hero section. Start by placing a background image that fills the width of the frame. If your image doesn’t cover the entire area, add complementary visual elements to enhance the design.
Add your name prominently on the left side. Increase the font size and make it bold for emphasis. Consider using two colors for your name—like black for the first name and purple for the surname—to create visual interest.
Position all text and images using Figma’s alignment guides. These red lines ensure everything lines up perfectly with other elements, giving your design a polished, professional appearance.
Enhance your hero section with 3D illustrations using Figma plugins. Install “Icon8” from Figma’s plugin library. This tool provides access to thousands of customizable illustrations.
Browse Icon8’s 3D illustration category and select elements that complement your portfolio theme. Place them strategically around your name to create depth. Use Figma’s layering tools to arrange elements—send backgrounds behind and bring key illustrations to the front.
Adjust the size and position of each illustration until the composition feels balanced. These visual touches make your portfolio stand out and showcase your design skills.
Extend your frame downward to add the About section. Start by creating a curved divider between sections for a smooth transition. Use the Shape Divider app (shapedivider.app) to generate this effect.
Choose a wave shape, invert it if needed, and download as SVG. Paste the SVG into Figma and position it at the bottom of your hero section. This creates an elegant flow into the About area.
Add an “About Us” heading with contrasting colors—black text with a highlighted word draws attention. Below it, include a brief bio: “Software developer working in IT industry for the last six years as a full stack developer.” Center-align this text for a clean look.
List your core skills in a centered format: “Expert in UI/UX design, front-end development, and back-end development.” Keep descriptions concise but informative to quickly communicate your expertise.
With this method, you can create a basic portfolio design in about 30 minutes. More complex designs may take longer, but Figma’s tools speed up the process significantly.
No, Figma is beginner-friendly. Its drag-and-drop interface and alignment guides make it accessible even for those new to design. The video tutorial provides clear step-by-step instructions.
Yes, Figma designs are developer-ready. The next video in this series covers converting this Figma design into a functional website using React or Angular.
Designing a portfolio website in Figma is straightforward with the right approach. Start with a clean frame, build consistent navigation, enhance with visual plugins, and create smooth section transitions. This method produces professional results quickly, even for beginners. Remember to keep text concise and use alignment tools for a polished finish.
Credit: Creator
Credit: Writer
Credit: Reviewer